Showing posts with label DIY. Show all posts

Thursday, October 6, 2016

Rain Stick - A 5 Minutes Craft

  This was a snow day last minute idea, just to give the kids something to do. All you need are:
  • Paper Towel roll
  • Duck Tape 
  • Scissors 
  • Aluminum Foil
  • Dry Rice 


Decorate it with the Duck tape.


Fold a Piece of tape on to itself, and use it to cover the bottom of the stick.


Twist the aluminum foil and place it inside of the stick.

Pour about a half a cup of rice in to the stick, over the foil. The rice hitting the foil is what will make the "rain" sound. 

And that is it! Now you have a fun rain stick to use to tell stories or to use as an instrument when the kids make music. 

How do you spend the time during long snow days?

Thursday, September 22, 2016

Let's Build It!


Lowe's has a program called Build and Grow. The program is basically a building clinic for the kids. The kids receive a kit to build something, for October it was a haunted house the opened up so you could put candy in it. There is a "work bench" set up with little hammers and space for the kids to build. The first time they go, the receive goggles and an apron. Every time they come back for a new project, the receive a new iron-on patch to put on their apron to show what they have already done. 
And the best part- it is completely free! 


The kiddos had a great time building and we will defiantly be coming back for more. Other chain hardware stores offer the same program with a different name. So if you have one in your town, check them out, because it is a lot of fun for the whole family to build something together. Not to mention that it is free and the kids get a toy out of it.


Monday, September 12, 2016

A Clean Car


I have been cleaning house and cleaning van. My van is usually like a big purse for me- it has everything I need inside, but I can never find anything when I need it.So I decided to put an end to the madness and organize it. And I'm kind of proud of how functional it turned out.  


The trunk has two big bags. The first one has emergency things, such as blankets, towels, extra outfits for the kids and neck pillows in case the kids get tired on trips. The other bag has umbrellas and everything for an instant picnic. There is a picnic blanket, some toys, bubbles and bug spray.  Next to the bags is the stroller that I still use when we go to the zoo, the fair or anyplace that the kids will want to be carried after a while. My husband thinks the kids are too big for the stroller, and they probably are. But I think they are too big for me to carry them, so the stroller stays.


I used a cereal container as a trashcan. That way nothing falls out on the floor while I drive, and my car never smells like garbage. 


I found these cute car-coasters a while back, but never used them until now. They look adorable and prevent ring stains on the bottom of the cup holders.


The storage between the sits has some more emergency stuff. It has a first aid kit, hand sanitize, extra trash bags, paper towels, pens, the kids music CDs and maps of the county and the town. After I took the picture, I also added a small container of Clorox wipes and some "Wet Ones".

How do you keep your car clean?


Tuesday, September 30, 2014

Free Halloween Printables


While preparing for the kids Halloween party, I decided to find some cute printables to help with the decoration. There are so many out there, it's hard to chose one. Here are my top 8!


free-printables-halloween-party

halloweenprintablesfullset

Spells and Potions Halloween: Creepy Jars & Candy Labels {Free Printables}

"You are the balm" Lip Balm Labels from www.thirtyhandmadedays.com


Halloween Printables: Spellbound Sweets


This last one is the one I chose for the kids party because the color matched perfectly with the goody bags and favors I found at Walmart. I'm saving the other for next year. 

Wednesday, September 10, 2014

Teacher Gifts


I know this is a little late for this school year, but maybe it will inspiration for the next teacher appreciation occasion. This little gift was super cute a cheap to put together as well.


I got plastic pencil cases from Walmart for 97 cents each.


Free Printable

I printed this adorable quote from the Balancing Home blog. I found the cutest tissues from Walmart, also for 97 cents. They had the picture of a screaming teacher and said "The students are coming!!" Which worked out great since the kids dropped the kids off to the teachers a week before school started, when they went to visit their new class.


I added some candy and this adorable printables from Thirsty Hand Made Days Blog. The printable had some information about the kids and a second card for the teacher to complete and return to me with some ideas to help me put together her next gifts.


I really wanted to fill up the pencil case so I got a few more things (to make it look full). I added a bookmark made by Salvation Army women in Papua New Guinea. I got these adorable miniature journals for 25 cents each at Walmart. When I went to the dollar store I got 3 note pats for a dollar and 3 pretty pens for a dollar as well. The apple sticky notes I got for 25 cents each, last year from a discount bend long after school had started.


We made 3 gift boxes, one for Truett's teacher and the other two for Charisma's teacher and assistant teacher. The kids loved picking out the goods for their teachers and the teachers seemed to really enjoy the thought they we put into it.
I'm supper exited to put together teacher gifts for all the coming holidays. How about you?

Wednesday, February 19, 2014

The Mommy Buck System

 
I love the mommy buck system! I can not take any credit for the idea. The master mind behind it is Jeff Kinney, the author of the "Diary of the Wimpy Kid" series. The concept was presented on the second book "Rodrick Rules" and since then I have seen mom's all over get creative with it. Here is our version of it.


On an attempt to not spoil the kids and teach them the value of things, we have them earn "mommy bucks". They are also working on their math without realizing it. The "bucks" are not anything fancy, monopoly money size paper that I hand write "Mommy Buck" on. For the sake of saving paper, we have three denominations $1, $5 and $10. They earn them by doing all their chores for the day (they usually have four of those a day), by eating all their food and making happy plates (that's what we call empty plates) and the other ones I kind of make it up as
I go along.

If one of them has an exceptionally good day, or work extra hard on a project I give them a mommy buck. Since they come to work with me everyday, I sometimes use a timer and tell them that if they can play without fighting until the timer goes off (I usually give them an hour) they each get a mommy buck. Whenever they don't succeed and fight, I restart the timer so they can still have a chance and I can get even more work done.

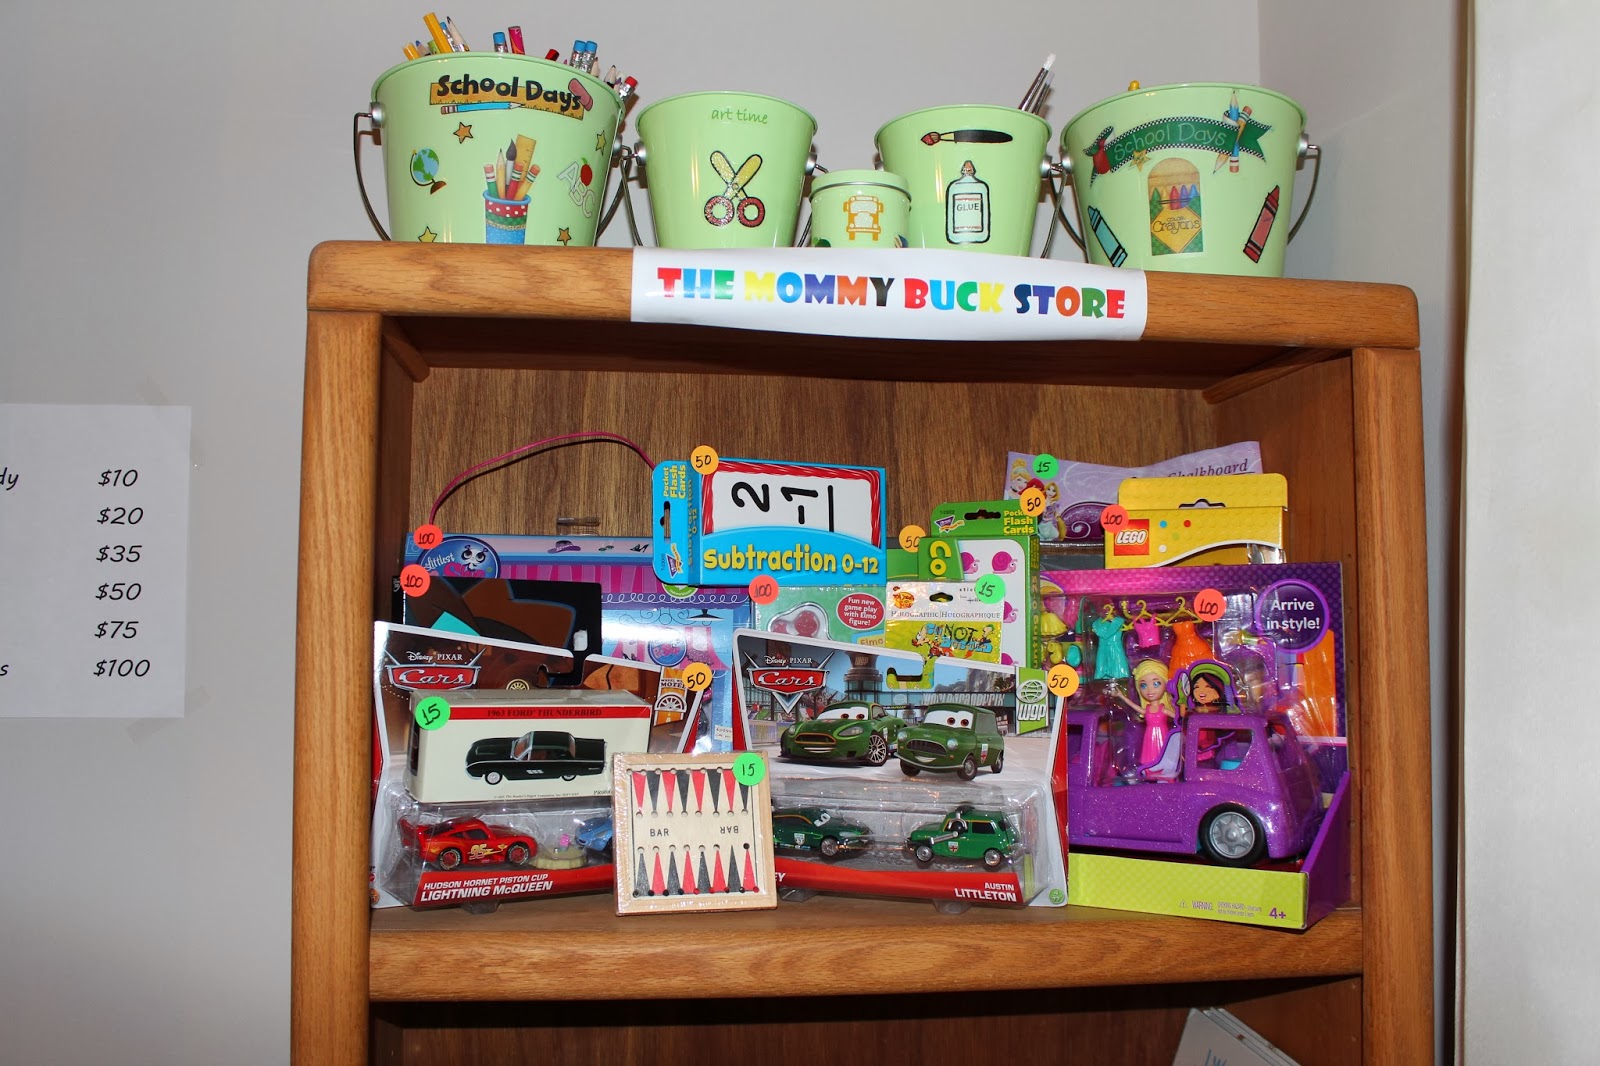
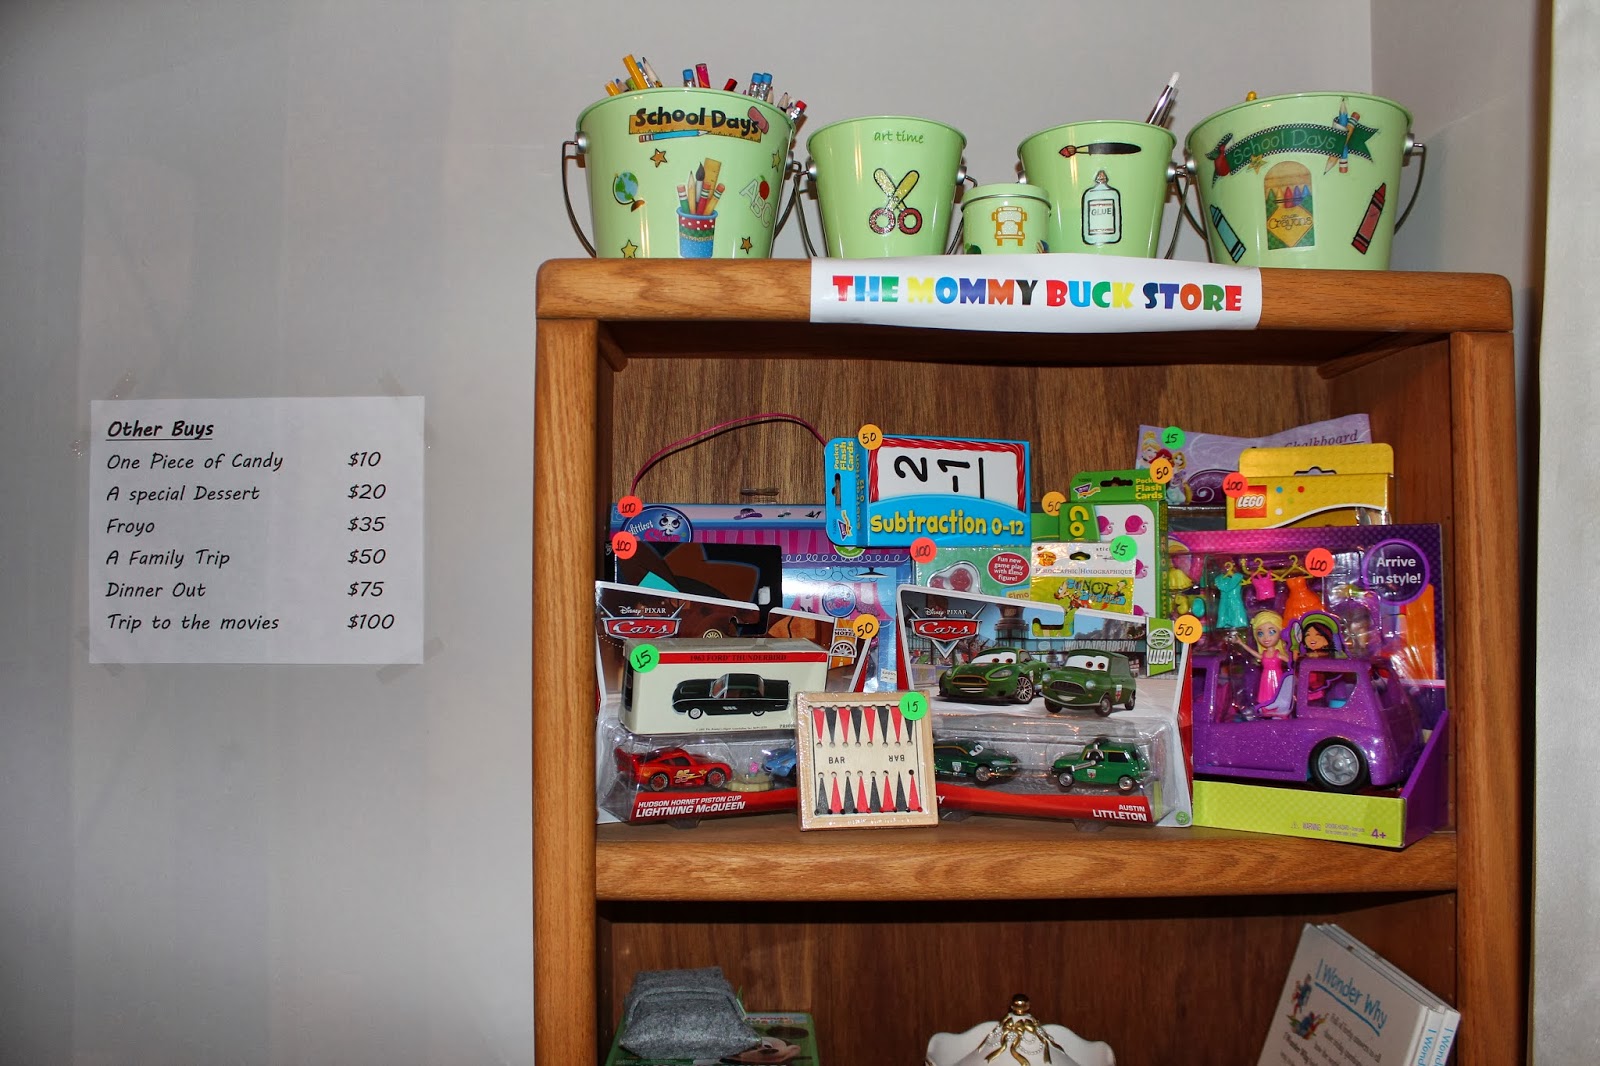
The other great part about it, is that if we go out and they want something, we don't just get it for them, we ask if they would like to work fr it, and if they do, we buy it and put it on the mommy buck shop.

The "Mommy Buck Shop" has toys as well as perks. Next to the shelf with the toys, taped on the wall, is a list of "other buys" that they can use they bucks on. They also only get to shop once a week, normally on Saturdays. and sometimes they don't buy anything at all, they save up for a bigger thing.

The kids are little and I'm sure the system will change as they grow. They will eventually have different ways of earning it and eventually they will earn it for different things. But for now, I'm really happy it is working.

Anyone else using mommy bucks? Is it working for you?
I would love to hear from other moms out there.

Friday, January 31, 2014

Glow in The Dark Fun

 
Truett got a "Glow in the Dark Lab" kit from a friend, and the kids have been loving it.


These pictures are from when we did the glow in the dark "disappearing ink". The ink looks invisible unless it's under the black light. The kids love this and have been constantly asking to do more.
The kit also makes glow in the dark paint, rubber toys, and lotion. Perhaps I'll share some pictures of that as well.
 
The kids are really interested into glowing things lately, so they really enjoy learning about it.
to go with the "Glow" theme. They don't even realize they are learning, they are just having fun.
 
We also read "The Day Glo Brothers" by Chris Barton, which is the story of the brothers that came up with the neon colors we now use on traffic cones, safety vests and so on.
 
I'm not sure if I could consider this an unit study, but we will learn as much as we can from it, until the kids move on to a new subject. Any more Glow in the dark ideas?