

Thursday, September 27, 2012
Monday, September 24, 2012

Growing Pumpkins
About 3 month ago, my 2 years old daughter and I went into our front yard and planted pumpkin seeds. And the seeds looked just like the ones we eat, so you can imagine how many times I had to take them out of her mouth.
Now, I did not do my home work and find out what I was doing before I planted them. Tho, to be honest, I wasn't sure that anything would even grow- I'm kind of know for having a brown thumb. So regardless silly me, I planted them in some very strategical spots, thinking that a little pumpkin would just sprout up where planted.
Little did I know that pumpkins vine, and in just a few weeks, my front yard looked like a jungle.
Despite my ignorance, and the mess on my front yard, the out coming was pretty awesome.
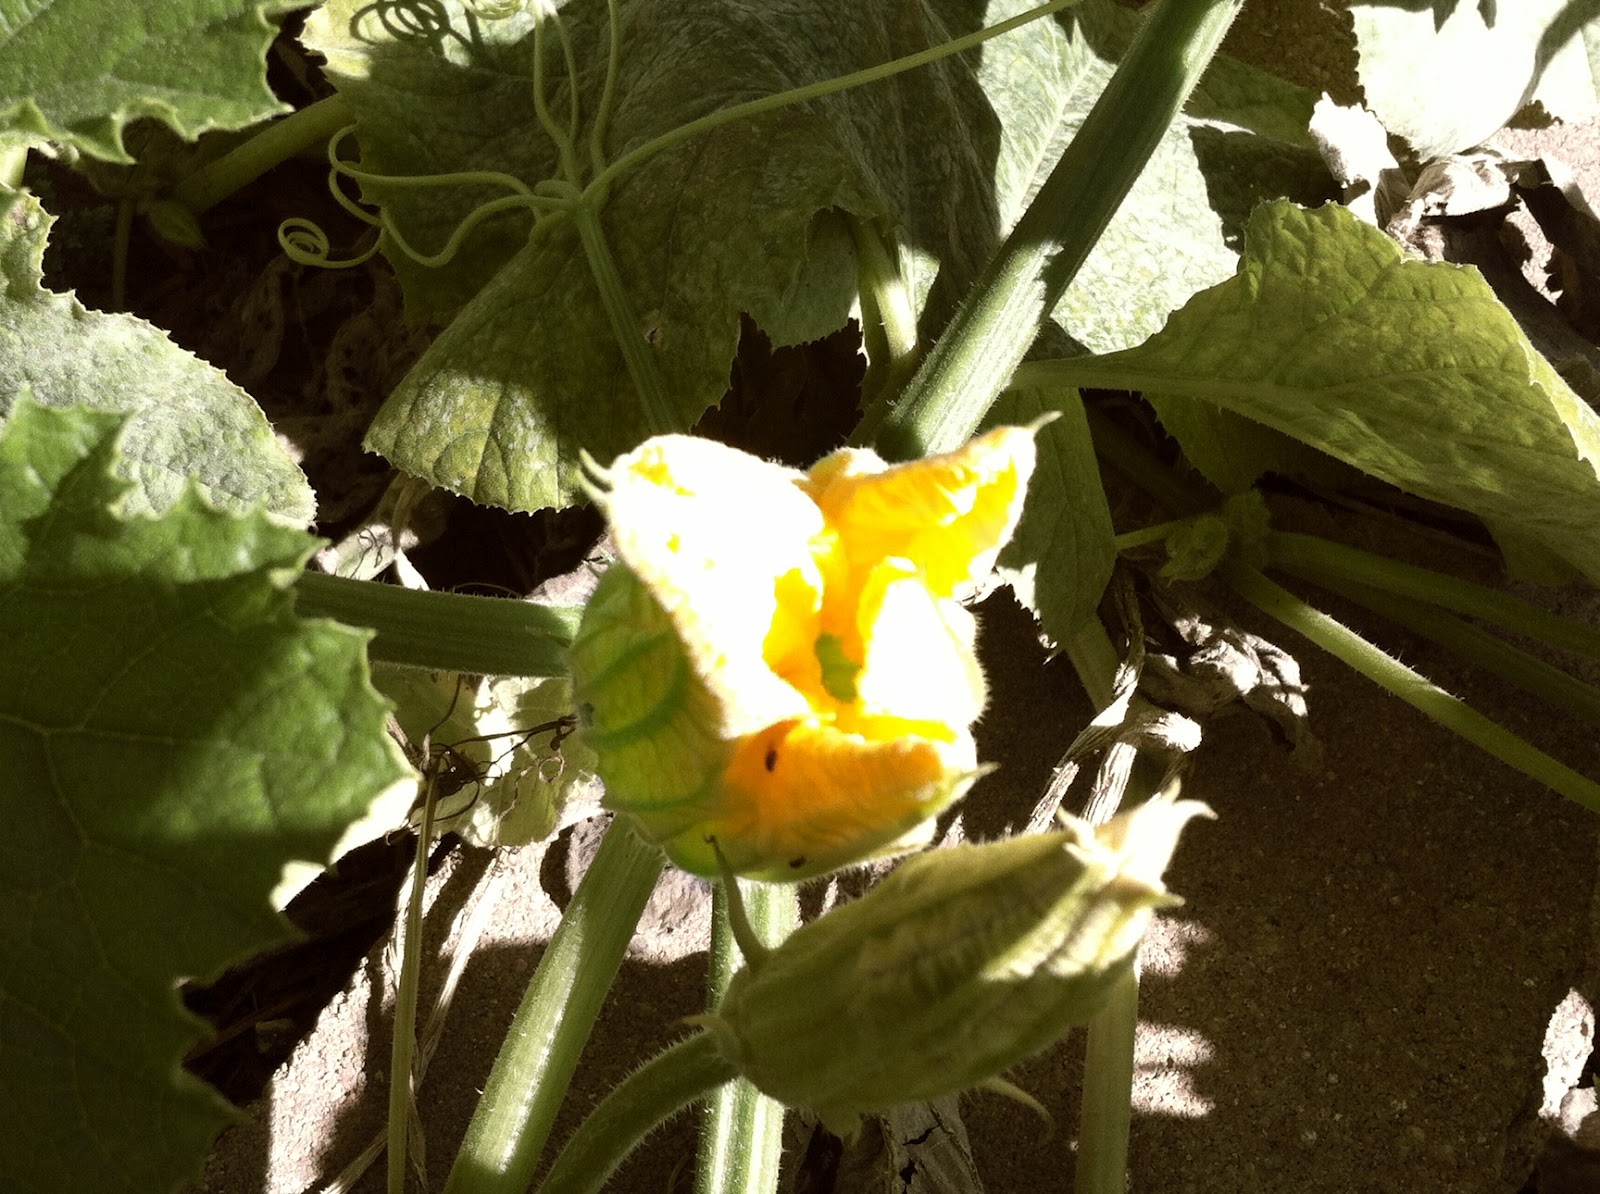
First I got some gorgeous yellow flowers.
 And from the bottom of the flowers, I got adorable little mellon looking things.
 While they were green, they kept on growing and the flower fell off. I was really cool to see the all at diffrent stages.


Now, I did not do my home work and find out what I was doing before I planted them. Tho, to be honest, I wasn't sure that anything would even grow- I'm kind of know for having a brown thumb. So regardless silly me, I planted them in some very strategical spots, thinking that a little pumpkin would just sprout up where planted.
Little did I know that pumpkins vine, and in just a few weeks, my front yard looked like a jungle.
Despite my ignorance, and the mess on my front yard, the out coming was pretty awesome.
First I got some gorgeous yellow flowers.
 And from the bottom of the flowers, I got adorable little mellon looking things.
 While they were green, they kept on growing and the flower fell off. I was really cool to see the all at diffrent stages.


And finally today I was able to harvest some of those pumpkin (someone told me that once they turned completely orange, they would go bad if they were not pull from the vine).


I harvested 7 of them and there are 11 more still changing colors.
Any one else growing punpkins this year? Any tips or ideas on what to do different next year?
This is the first time I ever had something I've planted grow. So as much as I hope this helps some of you, I would also hope some of you you have some ideas on how to do this better next time.
Keeping it Crafty,
Nessy
Sunday, September 23, 2012

Thursday, September 20, 2012

Wednesday, September 19, 2012
Charisma's Curls-wow!

 |
| Told you it was messy! |
 Most days, I put a little clip on the front of her hair, just to keep it from falling on her face and let the rest fly free. But now that she is going to day care I decided that I want to contain it a bit, for the sake of the other kids.
 So this morning it was piggytail time since her hair was extra wild. Which took at lot longer than I untisipared, since she is 2 and has the attention span of a gold fish. But it was worth at the end. She looked so cute telling me not to touch her hair anymore.


Tuesday, September 18, 2012

"Book" bookshelves
This are my new bookshelves over my crafts desk at home. The are bookshelves, not because they hold books, but because they are made of books. I got the idea from http://craftgawker.com/. So I went to the Goodwill store and got two large books (less than $5 for both) and to the hardware store and got 4 wall brackets, found some screws in my husbands tool box, and Voila! New, stylish bookshelves.


Here is where is got the idea from.

How do you like this project. I would love to see how yours turns out, so please share!
Keeping it crafty,
Nessy
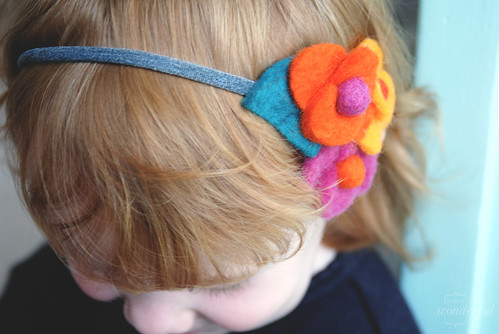
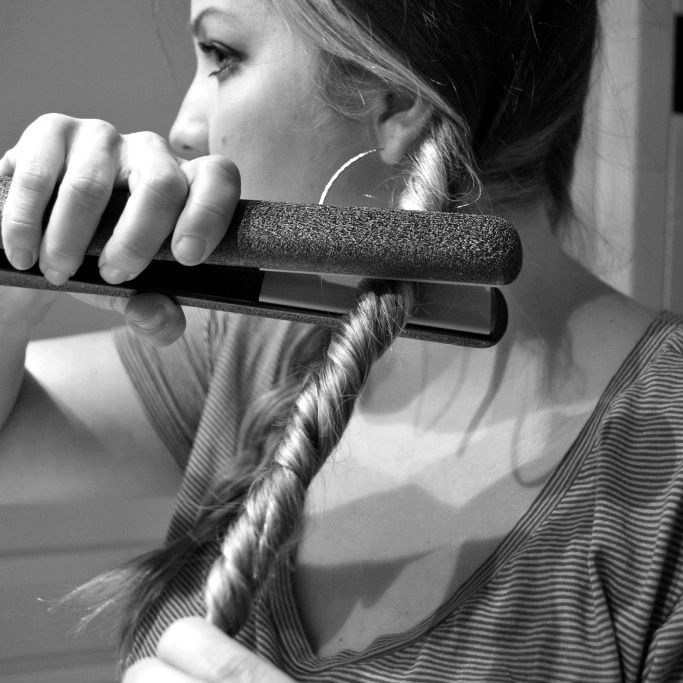
Rolled Fabric Flower Tutorial with video
I love these little flowers and I use them all the time for everything.
So here is the tutorial:
 1- I always put the edges of the ribbon of heat in order to avoid fray. The heat makes it kind of melt on to itself. (Make sure you hold over and not on the fire, it will look black and burn if you do)
2- Fold the ribbon in half.
3- Roll the middle to create a solid middle.
4- Start twisting the ribbon as you go around with it. And when you get to the end, fold the end onto the bottom, and glue it together.
* I do glue the ribbon as I go.
And there you have it! An adorable rose to embellish anything you can imagine.

 I use them for headbands, hair clips and much more. I also use the to embellish things like this clutch I made.
If you are anything like me, the video is the best way to learn, so here is the tutorial I learnexd from. Hers is a little different because she is using fabric instead of ribbon, so the fray is expected. Also, I will use another materail when attaching it to something like a headband. I put the flower over the band and a small felt circle under it, that way the band is secured between two things. Otherwise, I use the ribbon excess to pull it together.
How do you like this project? I would really love some feed back.
So here is the tutorial:

2- Fold the ribbon in half.
3- Roll the middle to create a solid middle.
4- Start twisting the ribbon as you go around with it. And when you get to the end, fold the end onto the bottom, and glue it together.
* I do glue the ribbon as I go.
And there you have it! An adorable rose to embellish anything you can imagine.

 I use them for headbands, hair clips and much more. I also use the to embellish things like this clutch I made.
 If you are anything like me, the video is the best way to learn, so here is the tutorial I learnexd from. Hers is a little different because she is using fabric instead of ribbon, so the fray is expected. Also, I will use another materail when attaching it to something like a headband. I put the flower over the band and a small felt circle under it, that way the band is secured between two things. Otherwise, I use the ribbon excess to pull it together.
How do you like this project? I would really love some feed back.
Keeping it crafty,
Nessy
Monday, September 17, 2012


Saturday, September 15, 2012

Friday, September 14, 2012
Upcycled Clutch- you'll never guess what it is made with
Like My new clutch? You can have one just like it, Check out how to DIY.

Here is the step by step DIY tutorial.

1- Grab yourself a place mat. This one was from the dollar store.
2- To decorate the front (and make sure it does not look like a place mat) measure and pin a piece of ribbon to where the front flap will be. If there is a tag, make sure it is on the opposite side.
3- Sew through the middle of the ribbon horizontally.
4- Fold over the ribbon and sew over it vertically, to secure it in place.

5- Making sure that the flap you decorated is left untouched, fold the bottom up as high as you want to make your clutch deep.
6- Sew the side up to the end of the shorter end. *Don't forget to back stitch to make sure it doesn't come undone.
7- Repeat the same to the other side.

8- Fold the the bottom corner into a triangle, this will be what widens the bottom of the bag for more room.
9- Sew through the triangle (again, don't forget to back stitch).
10- Cut the triangle part outside of the stitching. Repeat on the other side, and and turn it right side out.

11- At this point, the top flap will be bigger than the actual clutch. Fold in the sides of the flap and sew it to make it fit.
12- Repeat on the other side.
13- I made a little rolled ribbon flower to attache to the front flap. Here is the tutorial for that.
14- Sew the flower to the front flap.

15- The flower may be very hard to sew, use a little glue, fabric or hot glue gun.
16/17- Once it is done, it will hold a lot more than you would expect. here it has my wallet, phone, Ipod and keys. And as you can see, there is still room for more.
18- It cost under $1.50 and took under 20 minutes to make. Now all that is left to do is enjoy it!
What did you think of this project? I would live to hear your feed back.
Subscribe, comment, share, like or follow.
Keeping it Crafty,
Nessy
How to Make a Sewing Machine Cover
 |
| My new sewing machine cover. |
I found the fabric at Walmart for $2.00 a yard.
I didn't do my own tutorial (I promise to try to get better at it) but here is the video that inspired me. And too be honest, hers looks a lot cuter than mine.
*On the video, she uses Fusible Fleece, I didn't use it and it worked out just fine. So consider that part optional.
How did you like this project?
Please give me some feed back. Share, Comment or follow.
Keeping it Crafty,
Nessy
Thursday, September 13, 2012
Clip of the day
 I love anything nautical. So this clip is one of my favorites.
And it looks even cuter on the hair
of little princesses!

And remember that youo can purchase any of these clips for you little pricess or queen.
Just Check us out at www.facebook.com/TrueCharismaCrafts
Crafts Round Up! A DIY for every taste and style
Everything I see something that inspires me, but I don't get around to do it for lack of time or materials. But that doesn't mean I can't share it and help you get inspired as well.
So here are my favorites from this week.


So here are my favorites from this week.
Keeping it Crafty,
Nessy
Subscribe to:
Posts (Atom)